
Factory resetting a laptop can significantly boost its performance by removing unnecessary files, malware, and software glitches. This process restores the device to its original state, eliminating any issues that have accumulated over time. Understanding how to factory reset a laptop is crucial for maintaining optimal performance and extending the lifespan of your device. Whether you’re dealing with persistent software issues, preparing to sell your laptop, or simply want a fresh start, a factory reset can provide the solution you need. By following the steps outlined in this guide, you can ensure a smooth reset process and rejuvenate your laptop’s performance. This comprehensive guide will cover the reasons to reset your laptop, step-by-step instructions for both Windows and MacBook devices, and essential tips for a successful reset.
Why Should You Factory Reset Your Laptop?
Factory resetting your laptop can address various performance issues, such as slow processing speeds, frequent crashes, and unresponsive applications. It can also help remove malware and viruses that typical antivirus programs may miss. Additionally, if you intend to sell or donate your laptop, a factory reset guarantees that all your personal data is securely erased. Regularly performing a factory reset can keep your laptop running smoothly and efficiently, providing a fresh start and preventing long-term issues from developing. This process is particularly beneficial if your laptop has been in use for an extended period, as it can accumulate a significant amount of residual data and software conflicts over time. By starting with a clean slate, you can optimize your laptop’s performance and enjoy a more responsive and reliable computing experience.
How to Factory Reset a Laptop for Windows ?
Step 1: Backup Your Data
Before resetting your Windows laptop, it’s essential to back up all important data to prevent data loss. Use an external hard drive, cloud storage, or a USB flash drive to save your documents, photos, and other critical files. Ensure that you double-check the backup to confirm all necessary data is securely stored. This step safeguards your information and allows you to restore it easily after the reset process. Many users overlook this crucial step, leading to permanent loss of valuable data. Tools like OneDrive or Google Drive can automate the backup process, making it easier to ensure all files are accounted for. Taking the time to thoroughly back up your data can save you from significant headaches and potential data recovery costs down the line.
Step 2: Access Reset Options
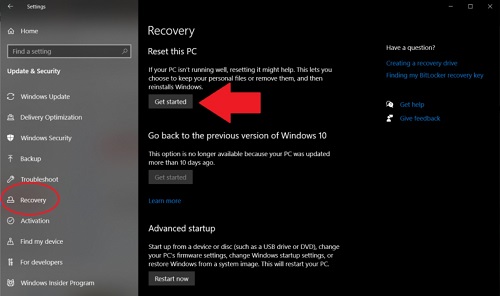
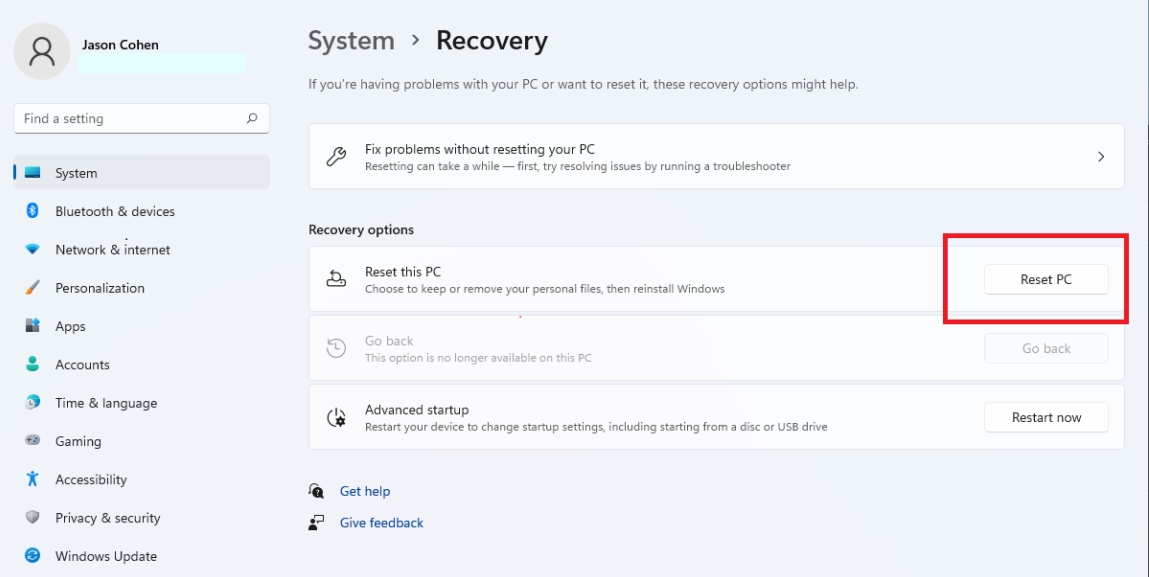
To begin the factory reset process on a Windows laptop, navigate to the Settings menu. From there, select ‘Update & Security,’ then ‘Recovery.’ Under the ‘Reset this PC’ section, click ‘Get started.’ You will be prompted to choose between ‘Keep my files’ and ‘Remove everything.’ Selecting the latter option will completely erase all data and settings, providing a clean slate for optimal performance. This choice is ideal for users looking to resolve deep-seated software issues or those preparing the laptop for a new owner. Ensure your laptop is plugged in or has sufficient battery life to avoid interruptions during the reset process. The system will guide you through the remaining steps, which may include confirming your choices and beginning the reset. Patience is key here, as the reset can take some time to complete.
Step 3: Follow the Reset Process
After selecting the appropriate reset option, follow the on-screen instructions to complete the factory reset. The process may take some time, depending on your laptop’s specifications and the amount of data being erased. Once the reset is complete, your laptop will restart automatically. You will need to go through the initial setup process, including configuring settings and reinstalling essential software. This fresh start can dramatically improve your laptop’s speed and efficiency. During the setup, take the opportunity to install the latest updates and drivers, which can further enhance performance and security. Reinstall only the necessary applications to maintain a streamlined system. This approach minimizes potential conflicts and ensures that your laptop remains fast and responsive. Remember, a factory reset is a powerful tool, but maintaining good practices, like regular updates and backups, is essential for long-term performance.
How to Factory Reset a Laptop for MacBooks?
Step 1: Backup Your Data with Time Machine
Backing up your data is crucial before performing a factory reset on your MacBook. Use Time Machine, Apple’s built-in backup feature, to create a comprehensive backup of your system. Connect an external hard drive, open Time Machine, and follow the prompts to back up your data. Verify that the backup is complete to ensure all important files are securely stored. This step ensures that you can restore your data seamlessly after the reset. Time Machine provides a straightforward and efficient way to back up your entire system, capturing everything from system files to personal documents. By ensuring a complete backup, you protect yourself from accidental data loss and make the post-reset restoration process much more manageable. Always double-check the backup status and verify the integrity of the saved data to avoid any unpleasant surprises.
Step 2: Restart in Recovery Mode
To initiate the factory reset on a MacBook, restart your device and immediately hold down the Command (⌘) and R keys until the Apple logo appears. This will boot your MacBook into Recovery Mode. Once in Recovery Mode, select ‘Disk Utility’ and choose your startup disk. Click ‘Erase,’ then follow the prompts to format the disk. This step prepares your MacBook for a clean installation of macOS. Be sure to choose the correct disk and format type to avoid any issues during the process. Recovery Mode offers a range of tools to help you troubleshoot and reset your MacBook, ensuring that the device is ready for a fresh start. Formatting the startup disk is a critical step, so take your time to confirm each action and follow the on-screen instructions carefully.
Step 3: Complete the Factory Reset
After erasing the startup disk, return to the Recovery Mode main menu and select ‘Reinstall macOS.’ Follow the on-screen prompts to download and install a new version of the operating system. This process may take some time, depending on your internet connection speed. Once the installation is complete, your MacBook will restart, and you can go through the initial setup process. Restoring your data from the Time Machine backup can help you quickly get back to work with an optimally performing MacBook. During the setup, ensure you configure essential settings and install updates to maximize performance and security. Only reinstall necessary applications to maintain a clean and efficient system. This careful approach helps prevent the reintroduction of old issues and keeps your MacBook running smoothly and efficiently.
Tips for a Successful Factory Reset
To ensure a smooth factory reset, follow these tips:
1.Backup Regularly: Regular backups prevent data loss and make it easier to restore your system after a reset.
2.Disconnect Peripherals: Remove all external devices, such as printers and USB drives, to avoid complications during the reset process.
3.Fully Charge Your Laptop: Ensure your laptop is fully charged or connected to a power source to prevent interruptions during the reset.
4.Update Software and Drivers: After the reset, update your operating system, software, and drivers to the latest versions for optimal performance.
5.Install Antivirus Software: Protect your freshly reset laptop by installing reliable antivirus software to prevent future malware infections.
6.Restore Data Selectively: Avoid restoring unnecessary files to maintain a clean and efficient system.
By following these tips, you can maximize the benefits of a factory reset and enjoy a smoother, more efficient computing experience. Taking these precautions helps ensure that the reset process goes smoothly and that your laptop remains in optimal condition long after the reset.
Conclusion
Knowing how to factory reset a laptop is a valuable skill for maintaining its performance and extending its lifespan. Whether you’re using a Windows laptop or a MacBook, following the correct procedures ensures a successful reset and a fresh start. Remember to back up your data, follow the reset instructions carefully, and implement best practices for post-reset setup. These steps will help you achieve optimal performance and keep your laptop running smoothly. A well-executed factory reset can rejuvenate your device, making it feel like new again. By understanding and utilizing this process, you can avoid many common issues that slow down laptops over time. Keep your laptop in top shape with regular maintenance and timely resets, ensuring it serves you well for years to come.
FAQs:
1.What should I do before factory resetting my laptop?
Before factory resetting your laptop, ensure you back up all important data to an external drive or cloud storage. Disconnect peripherals, fully charge your laptop, and note any essential software and license keys for reinstallation.
2. Will factory resetting my laptop delete all my files?
Yes, a factory reset will erase all files, settings, and applications, returning the laptop to its original state. Ensure you have backed up all important data before proceeding.
3. How often should I factory reset my laptop for optimal performance?
Factory resetting your laptop should be a last resort for fixing performance issues or preparing the device for sale. Regular maintenance, such as updating software and running antivirus scans, can help maintain performance without frequent resets.